因為 Jenkins 的 Xcode Integration 有點難用而且專案一多,要個別維護有點麻煩,如果 Provisioning Profile 有新增裝置 就要重新上傳
用 Fastlane 用相同設定 帶入不同的 Scheme 就可以完成
ProvisioningProfile 可直接讀取/Library 底下的內容
CodeSign 用 Xcode 的自動下載就好可以完成
Jenkins
Bitbucket -> Jenkins -> Fastlane -> Slack …
安裝 Jenkins
1
2
| brew install java8
brew install Jenkins
|
- Source Code Management
- Git
- Repositories
- Branches to build
Execute shell
 1
 2
 3
 4
 5
 6
 7
 8
 9
10
11
12
13
| #!/bin/sh
cd ${WORKSPACE}
source ~/.bash_profile
git checkout Your_Branch_Name
#先切換 Branch 不然 increase commit 會跑到 HEAD detached
git fetch
git merge your_remote/your_branch
fastlane your_lane
|
Fastlane
Ruby 語言寫成的
安裝
1
| brew cask install Fastlane
|
安裝完要更新一下 bash_profiles
1
2
3
| #~/.bash_profiles
export PATH="$HOME/.fastlane/bin
|
執行
在專案資料夾初始化 Fastlane
在專案目錄下執行
在 /your/proj/path/fastlane 下執行也可以
執行 Fastlane 主要是根據 Fastfile 會在
1
| /your/proj/path/fastlane/Fastfile
|
還有其他安裝與執行方式
rbenv,bundler etc.,
Code Signing
打包要用的 Provision Profile and Cert. 有很多種方式,這邊使用手動的方法
或是使用 match
在 Xocde > Preference > Accounts 登入,然後下載全部的 Provisioning Profile
Provisioning Profile 預設位置在 ~/Library/MobileDevice/Provisioning Profiles
Keychain 匯入 Distribuion Cert.
Project Target > Gerenal > Signing 憑證必須選對
設定檔
 1
 2
 3
 4
 5
 6
 7
 8
 9
10
11
12
13
14
15
16
17
18
19
20
21
22
23
24
| update_fastlane
default_platform(:ios)
platform :ios do
lane :your_lane do
build_ios_app(
scheme: "YourScheme",
workspace: "YourProject.xcworkspace",
configuration: "Release", # or Debug
export_options: {
method: "ad-hoc",
provisioningProfiles: {
"your.domain.udid" => "project1_adhoc_name"
},
iCloudContainerEnvironment: "Production", # or 'Development'
},
clean: true,
output_directory: "build",
output_name: "ota.ipa",
include_bitcode: false,
)
end
end
|
1
2
3
4
| Dir.chdir ".." do
# your script
end
#效果等於 "cd .."
|
1
2
3
4
5
6
7
8
| #在一般command line
sh abcd.sh arg1 arg2
pwd
echo AA
#在Fastfile
sh "bash 'arg1' 'arg2'"
sh 'pwd'
sh "echo 'AA'"
|
使用 sh 起始位置會在/your/proj/path/fastlane
使用 fastlane 其他 action 起始位置在 /your/proj/path
 1
 2
 3
 4
 5
 6
 7
 8
 9
10
11
12
13
14
15
| #宣告
var1 = "foo"
var2 = "bar"
var3 = var1 + "123" + var2
#var3 = foo123bar
#傳入參數到 bash 雙引號加上單引號的 Nested
sh "bash script.sh '#{var1}' ''$PWD'/'#{var2}'/' '#{var3}'"
#在Fastfile內 用雙引號就可以
yourFunc("ZXC#{var1}QSD")
def yourFunc(A)
#傳入參數 A 為 -> ZXCfooQSD
end
|
1
2
3
4
5
6
7
8
| def yourfuncA(arg1,arg2,arg3)
#some script
end
#使用
lane :your_lane do
yourfuncA("A","B","C")
end
|
 1
 2
 3
 4
 5
 6
 7
 8
 9
10
11
12
13
14
15
16
17
18
19
20
21
22
23
24
25
26
27
28
29
30
| #宣告成function
def increase_build_number_and_git_push(schemeName,target)
increment_build_number_in_plist(target: schemeName)
info_plist_path = get_info_plist_path(xcodeproj: 'YourProj.xcodeproj', # optional
target: schemeName, # optional, or `scheme`
# optional, must be specified if you have different Info.plist build settings
# for different build configurations
build_configuration_name: 'Release')
app_name = get_info_plist_value(path: info_plist_path, key: "CFBundleDisplayName")
ver_number = get_info_plist_value(path: info_plist_path, key: "CFBundleShortVersionString")
build_number = get_info_plist_value(path: info_plist_path, key: "CFBundleVersion")
git_commit(path:info_plist_path, message:"[CI-Skip] Updated [#{app_name}] v#{ver_number} Build #{build_number} for #{target}")
push_to_git_remote(
remote: "origin", # optional, default: "origin"
# local_branch: "release", # optional, aliased by "branch", default is set to current branch
remote_branch: "release", # optional, default is set to local_branch
force: true, # optional, default: false
force_with_lease: true, # optional, default: false
tags: false, # optional, default: true
no_verify: true,# optional, default: false
set_upstream: true # optional, default: false
)
end
# 執行
increase_build_number_and_git_push("Your_Proj_Scheme","iTunesConnect")
# # 執行結果:
# 在Release Branch 會自動 git push -f
# commit 訊息:[CI-Skip] Updated [AppName] v1.9.18 Build 1 for iTunesConnect
|
也可以使用 increment_build_number
但是會把 xcworkspace 裡面全部 scheme 的 build number 都加一
個別指定 target 就用 increment_build_number_in_plist 參考
必須先安裝第三方外掛:fastlane add_plugin versioning 套件網址
1
2
3
4
5
| begin
functionA("arg1","arg2")
rescue => exception
on_error_Func(exception)
end
|
1
2
3
4
| upload_symbols_to_crashlytics(
dsym_path: "./build/yourapp.app.dSYM.zip",
gsp_path: "./your/firebase/GoogleService-info.plist"
)
|
除錯
Slack
傳訊息進去 Slack 是利用 Webhook 方式
再依照他的API傳入對應參數
Fastlane 有封裝好的 plugin
只要填入 Slack Webhook 就可以
https://docs.fastlane.tools/actions/slack/
幾個 Slack 範例
1
2
3
4
5
6
7
8
9
10
11
12
13
14
15
16
17
18
19
20
21
22
|
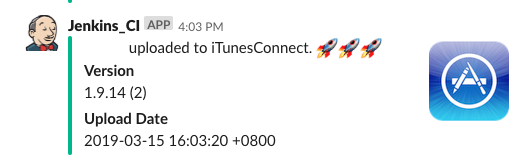
def slack_itunes(appName,appScheme,ipaPath)
ver = get_ipa_info_plist_value(ipa: ipaPath, key: "CFBundleShortVersionString")
build = get_ipa_info_plist_value(ipa: ipaPath, key: "CFBundleVersion")
slack(
message: "["+appName + "] uploaded to iTunesConnect. 🚀🚀🚀",
success: true,
channel: "#your_channel",
slack_url: "https://your/slack/webhook",
username: "Jenkins_CI",
icon_url: "http://Bot大頭貼/icon/jenkins.png",
default_payloads: [],
link_names: true,
payload: {
"Version" => "#{ver}" + " (" + "#{build}" + ")",
"Upload Date" => Time.new.to_s,
},
attachment_properties: {
thumb_url: "https://i.imgur.com/STnXPFy.png",
}
)
end
|
效果:
attachment_properties
代表包裝好的參數之外
可傳入 Slack API 有的參數
https://api.slack.com/docs/message-attachments
 1
 2
 3
 4
 5
 6
 7
 8
 9
10
11
12
13
14
15
16
17
18
19
20
21
22
23
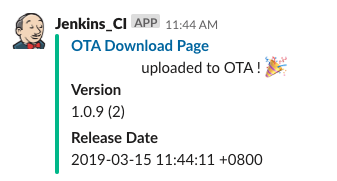
| def slack_ota(appName,appScheme,ipaPath)
ver = get_ipa_info_plist_value(ipa: ipaPath, key: "CFBundleShortVersionString")
build = get_ipa_info_plist_value(ipa: ipaPath, key: "CFBundleVersion")
slack(
slack_url: "https://your/slack/webhook",
message: "["+appName + "] uploaded to OTA ! 🎉",
username: "Jenkins_CI",
link_names: "http://Your.CI.Server.domain",
icon_url: "http://Jenkins.icon/jenkins.png",
channel: "#jenkins_bot",
success: true,
payload: {
"Version" => "#{ver}" + " (" + "#{build}" + ")",
"Release Date" => Time.new.to_s,
},
default_payloads: [],
attachment_properties: {
color: "#2eb886",
title: "OTA Download Page",
title_link: "https://Your.OTA.download/page",
},
)
end
|
效果:
 1
 2
 3
 4
 5
 6
 7
 8
 9
10
11
12
13
14
15
16
17
18
19
20
21
22
23
24
25
26
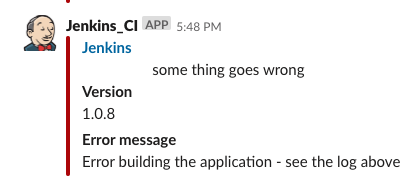
| def on_error(exception,appName,appScheme)
slack(
message: "[" +appName+ "] some thing goes wrong",
success: false,
channel: "#Your_Error_Msg_Channel",
slack_url: "https://Your.webhook",
username: "Jenkins_CI",
icon_url: "http://Jenkins.Thumbnail.icon/jenkins.png",
default_payloads: [],
payload: {
"Version" => get_version_number(xcodeproj: "YourProj.xcodeproj",target: appScheme),
},
attachment_properties: {
fields: [
{
title: "Error message",
value: exception.to_s,
short: false
}
],
title: "Jenkins",
title_link: "http://Your.CI.Server.domain/",
}
)
end
|
效果: