背景
在 Apple Silicon Mac 開發 .NET 專案會用到多個版本(.NET Core 2.2 / 3.1、.NET 6 / 8 / 10)。一開始用 isen-ng/dotnet-sdk-versions 這個 brew tap 用得好好的,直到裝 2.2 整個炸開。
一開始:用 isen-ng tap
爬文找到 isen-ng/dotnet-sdk-versions,從 2.x 一路到最新版各 feature band 全收,可以挑特定版本,比官方 cask 方便:
 1
 2
 3
 4
 5
 6
 7
 8
 9
10
| brew tap isen-ng/dotnet-sdk-versions
brew install --cask isen-ng/dotnet-sdk-versions/dotnet-sdk6-0-400
brew install --cask isen-ng/dotnet-sdk-versions/dotnet-sdk8-0-400
brew install --cask isen-ng/dotnet-sdk-versions/dotnet-sdk10-0-100
# 還能用
brew install --cask isen-ng/.../dotnet-sdk3-1-400
# 整個開發環境爆炸
brew install --cask isen-ng/.../dotnet-sdk2-2-400
|
裝完 2.2 整套 dotnet 全死,連原本好好的 6/8/10 也壞掉。
1
2
3
| #直接噴錯
arch: /usr/local/share/dotnet/x64/dotnet isn't executable
have 'arm64', need 'x86_64'
|
為啥會炸
.NET 在 macOS 的安裝結構:
1
2
3
4
5
| /usr/local/share/dotnet/
├── dotnet ← 共用執行檔(所有版本共用一份)
├── host/fxr/ ← 共用,framework resolver
├── sdk/<version>/ ← 各版本獨立
└── shared/.../<ver>/ ← 各版本獨立
|
fxr 全名 hostfxr,dotnet 啟動時靠它決定要載哪個版本(讀 global.json 之類的)。
重點是:dotnet 跟 host/fxr/ 只有一份,所有版本共用,多版本共存就靠這個。
isen-ng 的 6/8/10 是 arm64 native,互相覆蓋共用區沒事。但 .NET Core 3.1 / 2.2 那時代根本沒 arm64 build 只能裝 x86_64,3.1 cask 有特別寫 logic 把 x64 內容裝到 /usr/local/share/dotnet/x64/,不動主路徑,所以還能共存。
2.2 cask 就沒有處理了,直接把 x86_64 .pkg 蓋上去,共用區的 host 跟 fxr 被換成 x86_64,跟原本要載的 arm64 SDK 架構打架,全死。
嘗試反安裝 .NET 2.2
想說刪掉 2.2 就好了吧,結果 6/8/10 還是壞的。後來看 cask caveats 才發現:
1
| Uninstalling will remove the shared runtime dependencies
|
也就是 uninstall 會砍共用 runtime,順便把其他版本能用的 host 一起送走。
而且砍完還一堆殘留:
1
2
3
4
5
| ls /usr/local/share/dotnet/shared/Microsoft.NETCore.App/
# runtime 都還在
pkgutil --pkgs | grep -i dotnet
# 一堆 receipt 還在
|
brew uninstall 只跑 cask 寫的 uninstall 區塊,runtime、hostfxr、各種 pkg receipt 都不會清。/etc/paths.d/dotnet*、~/.dotnet/ 也是。
核彈級刪光 dotnet
下面 script 把所有可能殘留的地方都刪一刪:
 1
 2
 3
 4
 5
 6
 7
 8
 9
10
11
12
13
14
15
16
17
18
19
20
21
22
23
| #!/usr/bin/env bash
set -u
# 砍實體目錄
sudo rm -rf /usr/local/share/dotnet
rm -rf ~/.dotnet ~/.nuget ~/.templateengine
# 砍 PATH 設定
sudo rm -f /etc/paths.d/dotnet /etc/paths.d/dotnet-cli-tools
# 砍 pkg receipts
pkgutil --pkgs | grep -i dotnet | while read -r pkg; do
sudo pkgutil --forget "$pkg"
done
# 砍 brew cask + tap(沒裝過某幾版會噴警告,不用理他)
brew uninstall --cask --force \
isen-ng/dotnet-sdk-versions/dotnet-sdk2-2-400 \
isen-ng/dotnet-sdk-versions/dotnet-sdk3-1-400 \
isen-ng/dotnet-sdk-versions/dotnet-sdk6-0-400 \
isen-ng/dotnet-sdk-versions/dotnet-sdk8-0-400 \
isen-ng/dotnet-sdk-versions/dotnet-sdk10-0-100 2>/dev/null || true
brew untap isen-ng/dotnet-sdk-versions 2>/dev/null || true
|
驗證刪除結果
1
2
3
4
5
| ls /usr/local/share/dotnet 2>&1
# 預期 No such file
pkgutil --pkgs | grep -i dotnet
# 預期空
|
shell rc(像是 ~/.zshrc)裡 PATH 有指到 dotnet 的那段、還有 DOTNET_ROOT,也記得手動刪掉。
1
2
| # 查 shell rc 裡有沒有 dotnet 殘留
grep -nE "dotnet|DOTNET" ~/.zshrc ~/.zprofile ~/.zshenv 2>/dev/null
|
重新安裝:改用官方 dotnet-install.sh
這次打算不用 homebrew 來管理,反正版本久久才升一次,全部換成微軟官方的 dotnet-install.sh。
 1
 2
 3
 4
 5
 6
 7
 8
 9
10
11
12
13
14
15
16
17
| #!/usr/bin/env bash
set -euo pipefail
INSTALL=/tmp/dotnet-install.sh
curl -fsSL https://dot.net/v1/dotnet-install.sh -o "$INSTALL"
chmod +x "$INSTALL"
# 不會炸的 — arm64 native,裝到 ~/.dotnet/
"$INSTALL" --channel 6.0 --install-dir "$HOME/.dotnet"
"$INSTALL" --channel 8.0 --install-dir "$HOME/.dotnet"
"$INSTALL" --channel 10.0 --install-dir "$HOME/.dotnet"
# 會炸的 — x86_64,安裝到一個方便管理的路徑(這裡用 ~/dotnet-x64/ 隔離)
"$INSTALL" --version 3.1.426 --architecture x64 --install-dir "$HOME/dotnet-x64"
"$INSTALL" --runtime dotnet --version 2.2.8 --architecture x64 --install-dir "$HOME/dotnet-x64"
rm "$INSTALL"
|
加進 ~/.zshrc:
1
2
| export DOTNET_ROOT="$HOME/.dotnet"
export PATH="$HOME/.dotnet:$HOME/.dotnet/tools:$PATH"
|
x64 那套不加 PATH,老專案在 Makefile 寫死路徑就好,之後 make publish 自己會走 x64 dotnet:
1
2
3
4
| DOTNET := arch -x86_64 $(HOME)/dotnet-x64/dotnet
publish:
$(DOTNET) publish src/XXX.Web.Host/XXX.Web.Host.csproj -c Release -o publish
|
x64 SDK 要透過 Rosetta 跑(arch -x86_64),因為 .NET Core 3.1 / 2.2 沒 arm64 build。
驗證安裝結果
 1
 2
 3
 4
 5
 6
 7
 8
 9
10
11
12
13
| exec zsh
dotnet --list-sdks
# 6.0.x / 8.0.x / 10.0.x
file $(which dotnet)
# arm64
arch -x86_64 ~/dotnet-x64/dotnet --list-sdks
# 3.1.426
arch -x86_64 ~/dotnet-x64/dotnet --list-runtimes
# 2.2.8 + 3.1.32
|
在 VS Code 要怎麼辦
VS Code 寫不了 .NET Core 2.x。C# Dev Kit (ms-dotnettools.csdevkit) 只支援 .NET 6+,老 .NET 專案要用 Rider。
Rider 設定
arm64 那套(6/8/10)裝在 ~/.dotnet/ 且加進 PATH,Rider 會自動偵測,不用設定。
老專案要走 ~/dotnet-x64/ 的話需要手動指定 SDK 路徑,缺點是每個專案要個別設定。
Solution-level 設定(只影響當前 solution,存在 .idea/ 不會 commit):
- 開啟 solution
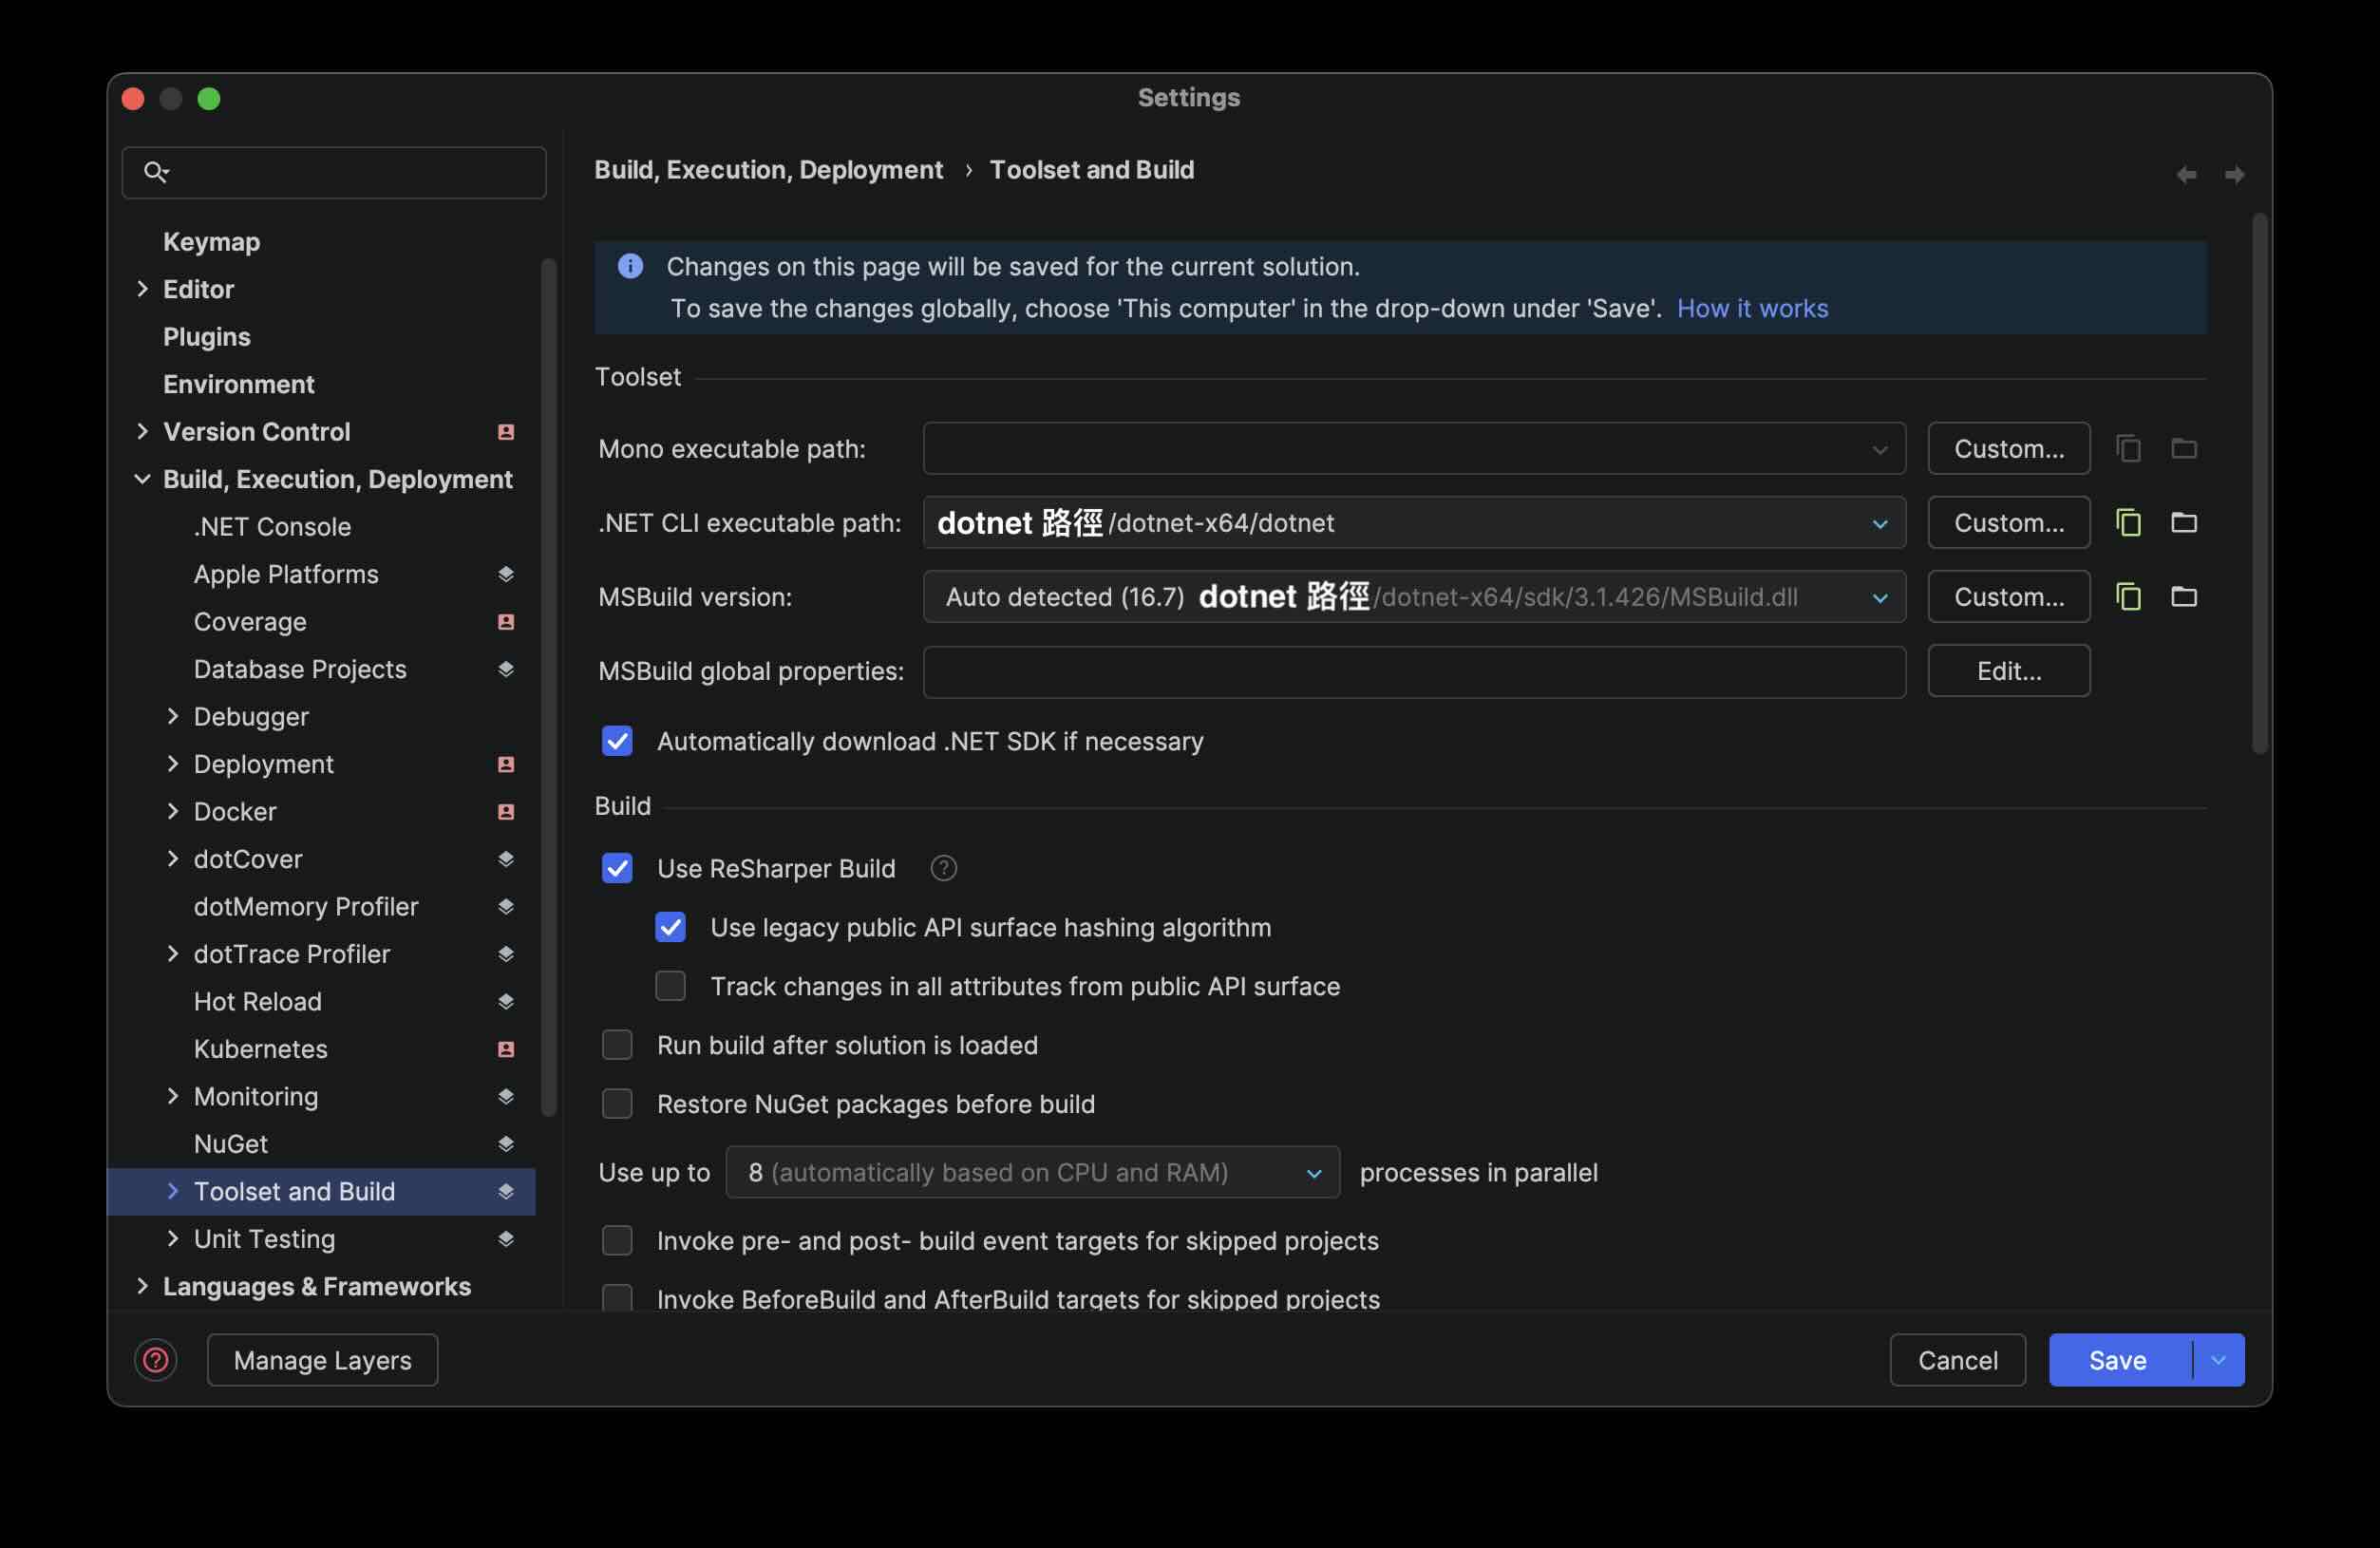
Rider → Settings(或 ⌘ ,)Build, Execution, Deployment → Toolset and Build.NET CLI executable path 填上 dotnet-install.sh 安裝時的絕對路徑(不能用 ~ 或 $HOME):1
| /Users/YOUR_HOME_FOLDER/dotnet-x64/dotnet
|
- Apply / OK
- 儲存選擇 solution personal
設完右下角會顯示偵測到的 SDK 版本,跟
global.json 對得上就 OK。
Rosetta 不用手動設,Rider 偵測到 x64 binary 會自動透過 Rosetta 執行(Use Rosetta when running x64 binaries 預設開)。
結論
歸納幾個使用情境
| 情境 | 怎麼裝 |
|---|
| 只用不會炸的版本(.NET 6+ arm64) | brew 官方 cask 就好 |
| 要碰會炸的版本(.NET Core 3.1 / 2.x,沒 arm64 build) | dotnet-install.sh 裝到自訂目錄隔離 |
| 兩個都要 | 上面兩個併用 |
| 想統一管理 | 全部用 dotnet-install.sh |
要記得的事:
- 所有版本共用一個 dotnet host,混架構就會炸
- 第三方 tap(像 isen-ng)uninstall 會殃及其他版本,caveats 有寫但很容易忽略
References